
OWASP? O'Please. A secure design pattern for RBAC authorization in Go.


This week at RunReveal we shipped Role Based Access Control for Users and API Token access! 🎉 We're really happy with how it turned out so we thought we'd share part 1 of the implementation.
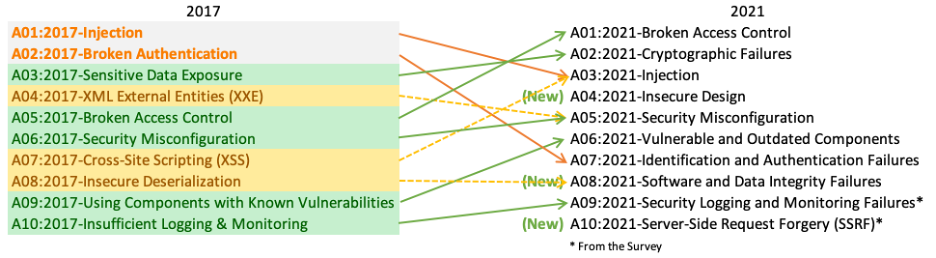
Access controls are an essential security building block for nearly every multi-user application in existence. They are hard to build properly, nearly impossible to outsource to a third party without a lot of overhead and risk and consequently as a result is the #1 vulnerability in the OWASP Top 10.
In the decade I've been writing Go professionally I've been looking for a pattern for Authorization that is dead simple to understand, maintain, and build upon down the road. We think our implementation comes close and as a bonus: it doesn't require any external dependencies. To demonstrate how it looks to use authentication and authorization in our Go API, I've included a short example below:
func initServer() {
    r := mux.NewRouter()
    // ...
    // Auth has signature:
    // func Auth(db *apidb.Store, wrapped http.HandlerFunc, perms ...types.Permission) http.Handler {
    // Detections
    r.Handle("/detections/create",
        Auth(s.db, s.CreateDetection, types.PermDetectionsEdit),
    ).Methods("POST", "OPTIONS")
    r.Handle("/detections/update",
        Auth(s.db, s.UpdateDetection, types.PermDetectionsEdit),
    ).Methods("PUT", "OPTIONS")
    r.Handle("/detections/list",
        Auth(s.db, s.ListDetections, types.PermDetectionsRead),
    ).Methods("GET", "OPTIONS")
    r.Handle("/detections/delete",
        Auth(s.db, s.UpdateEnabledFlag, types.PermDetectionsDelete),
    ).Methods("POST", "OPTIONS")
    r.Handle("/detections/sync",
        Auth(s.db, s.SyncDetections, types.PermDetectionsEdit),
    ).Methods("POST", "OPTIONS")
    // ...
}
In this example, with boilerplate omitted for brevity, we're initializing a gorilla/mux Router and adding our routes to it. A middleware called Auth wraps an http.Handler which adds both a session authentication check as well as a route authorization check. To determine whether or not a user or API token is authorized, we pass in the required permissions for the route. We can't speak for others, but we find it very easy to comprehend and review.
This post will give a brief background on RBAC including a quick review on the difference between Authorization ("AuthZ") versus Authentication ("AuthN"), then we'll get into the details of the implementation and how you might be able to apply this pattern to your own Go HTTP Servers. In future posts, we'll expand upon this one and walk you through building a sophisticated yet simple RBAC system. If you're familiar with the distinction, jump to the implementation!
This work was prompted by our efforts to lean more into detection-as-code workflows and enable fine-grained permissions for API access from continuous integration pipelines. As such, managing detections as code using git workflows is coming soon! Register for our mailing list to be the first to know about when this gets released and how it works.
Authentication and Authorization Background
Authentication and Authorization bugs continue to plague the OWASP top 10 most common vulnerabilities with Broken Access Control (authorization) taking the top spot as of 2021.
Needless to say, authorization and authentication are hard. Due to lack of training and education, many developers don't know the distinction between the two concepts.
If you're one of the lucky 10,000 today, then hopefully we can help clear things up so you can understand the difference and why the difference is significant.
Authentication (frequently referred to as "AuthN") is the process and means of establishing "who you are". In practice on the web this usually looks like a username and password, a cookie on an HTTP request, or a federated identity in the form of a trusted third party attesting who you are. We're not going to get deep into authentication in this blog post, but know that establishing a secure source of a user's identity is a pre-requisite of authorization.
Authorization (often "AuthZ") is the process by which a access controls are applied to users when performing actions on resources. The most basic example is your bank may know that you are a customer, but they also need to ensure that you can only manage your bank account.
Why Role Based Access Control is the most popular method for AuthZ
There are dozens of various strategies to implementing access controls, but by far the most common seen in web-applications is role-based access control (RBAC). In role-based access control systems, there are 3 entities:
- Subjects — The user or actor (e.g. API Token) performing the action.
- Roles — A Role is a collection of permissions that role can perform.
- Permissions — A Permission is a grant of an action (e.g. Read, Edit) to a resource.
RBAC allows application builders to group permissions into roles which are likely to be already familiar to the users of the software, which is the cause for its popularity. For example, an application "admin" role often reflects the ability to perform most or all actions against all resources in the application. An "analyst" role is one which might only be able to access and read resources in the application, but cannot alter or delete resources.
Hopefully the above summary of AuthN and AuthZ provides a good basis for appreciating both how complex these systems can get as well as the importance of keeping your framework for authorization in your application simple.
Authentication in Go
Authentication is it's own can of worms that deserves it's own post altogether, but of course must happen prior to implementing authorization. Here's what you need to know about how we do authentication to understand the pieces necessary for implementing Authorization afterwards.
We federate our identity management to 3rd-party identity providers (IDPs) using OAuth. We currently support Google, Microsoft, and Github as identity providers. After we authenticate the user using OAuth, we generate a random token, hash it and store the session hash in the database alongside an expiration. After a successful OAuth flow, we send the token back to the client as a cookie on the final http response.
The cookie is then used to set the Authorization header using Javascript on any subsequent HTTP request to our API. If implementing simple and secure Authentication in Go using third party identity-providers is something you'd like to hear more about, let us know!
If you're trying to implement Authentication in Go now and looking for good resources on the topic, the respected Eli Bendersky has some great posts on implementing Authentication in Go with Github and Google as auth providers using OAuth.
How we do Authorization
As I was implementing this, I was shocked by its simplicity once it started coming together. We needed to do just 3 things:
- Add roles to the database tables for Users and API tokens.
- Create a set of standard roles and assign permissions to them.
- Verify that the permissions granted via the roles to the users match the permissions assigned to a given route.
For the first step, we created a database migration and added the column "roles" to both tables, which is represented by an array of strings. An example for the tokens table:
BEGIN;
ALTER TABLE workspace_tokens ADD COLUMN roles text[] NOT NULL DEFAULT ARRAY['admin'];
ALTER TABLE workspace_tokens ALTER COLUMN roles DROP DEFAULT;
COMMIT;
Second, we had to choose some default roles to make using RBAC simple and understandable without any prior knowledge of our service. We landed on Administrator, Analyst, and CIBot for starters.
Administrators are the super-users of the application today. They have global privileges within the context of a workspace. Analysts can read and write detections and queries, but otherwise can't add or remove sources, notification channels or manage other users. Finally CIBots can only update and manage detections and have no additional privileges in the workspace.
The third step is perhaps the most interesting. At first, I considered abstracting authorization into it's own package and calling a function to verify access in every http handler in our application. This seemed needlessly verbose and prone to programmer error.

While looking for another solution, I realized that we were already loading the user from the database when doing authentication, so why not load and check the roles at the same time? That lead me to implementing authorization in the aptly-named "Auth" middleware, combining authentication and authorization into the same stage of the request.
While it is important to not conflate the two concepts, AuthN and AuthZ, it's also important to be pragmatic and realize that they're tightly coupled anyway. So I went ahead and started implementing the authorization checks at the end of our Auth middleware. Below you'll find an abbreviated example of our middleware implementation, with some boilerplate and some errors unchecked for brevity. See the Role and Permission type definitions at the end of the post if curious.
func Auth(db *apidb.Store, wrapped http.HandlerFunc, perms ...types.Permission) http.Handler {
    return http.HandlerFunc(func(w http.ResponseWriter, r *http.Request) {
        // Load and verify user/token session from database using Authorization Header on request
        // e.g. something like this, where the DB ensures the token is valid and not expired
        // _, sessToken, ok := r.BasicAuth()
        // session, authed, err := db.ValidateSession(sessToken)
        // Handle !authed and err cases.

        var wkspAndRoles types.WorkspaceRoles
        if session.Type == types.UserSession {
            // Users can be members of multiple workspaces.
            // Load the context for the workspace the user is trying to access.
            // Ensure the user is an active member of the workspace.
            workspaceID := query.Get("workspaceid")
            userWkspCtx, isMember, err := db.GetUserWorkspaceCtx(session.UserID, workspaceID)
            switch {
            case err != nil:
                HandleErr(w, r, types.AuthError(err))
                return
            case !isMember:
                HandleErr(w, r, types.AuthError("workspace unknown or user is not a member"))
                return
            }
            wkspAndRoles = userWkspCtx
        } else {
            // tokens are scoped to a workspace and loaded on session validation
            wkspAndRoles = session.WorkspaceRoles
        }

        // Check the assigned roles having the permissions required for the request.
        // Note that permissions are checked against roles one-at-a-time, so a user
        // having multiple roles with different permissions will only be authorized
        // if one of the roles has all of the required permissions.
        for _, subjRole := range wkspAndRoles.Roles {
            if role, ok := rolesMap[subjRole]; ok && role.HasPermissions(perms) {
                wrapped.ServeHTTP(w, r)
                return
            }
        }
        HandleErr(w, r, types.AuthErr(errors.New("not authorized")))
    })
}

// Statically provisioned default roles.  When necessary, we'll enable
// customers to create roles specific to their use cases in the database.
var rolesMap = map[string]types.Role{
    "admin":   roleAdmin,
    "analyst": roleAnalyst,
    "cibot":   roleDetectionSync,
}

// the CI bot role as an example of how permission assignment works:
var roleDetectionSync = types.Role{
	Name: "cibot",
	Permissions: []types.Permission{
		PermDetectionRead,
		PermDetectionEdit,
		PermDetectionDelete,
	},
}
In the database, we have 2 tables for both subject types: Users and API Tokens. We load the session associated with the token on the Authorization header, if present, and do a check on the session to see if it's a user or token based session. Since our users can belong to multiple workspaces, we do an additional round trip to the database to load the workspace roles assigned to the user for the workspace specified.
Finally, we simply loop over the roles and check to see if a role provides the necessary permissions given by the middleware wrapper at route definition time. The permissions passed in use the spread syntax for optional parameters in Go, meaning that it's possible that a route doesn't pass any in. In that case, we limit access to the workspace admin role only. Otherwise, because roles are checked one-at-a-time, a user having multiple roles with different permissions will only be authorized if one of the roles has all of the required permissions. While we could have implemented a union of all the permissions granted by all the roles before doing the access check, it's more complex and harder to understand so we decided to keep it simple.
If a user/subject has no role which satisfies those constraints, then we issue the 401 not authorized response to the user. To see the default roles and their associated permissions that we support today, visit our documentation here. Let us know if there's any other roles you'd like to see or think would be useful to have.
What's next?
The simplicity of this implementation provides a foundation for the future where we extend the framework to support new features like customer-defined roles in the database and row level access controls. Row level access controls would enable the ability to control access to individual sources or individual detections, versus controlling access to all the sources or detections in a workspace, as it is today.
The next milestone is building the capability for customers to define custom roles that can be assigned to an subject that have a custom set of permissions and resources. Subscribe to the blog to be notified of our developments and stay up to date with how we're building RunReveal!
Appendix
Role and Permission Type Definitions
type Permission string

type Role struct {
    Name        string
    Permissions []Permission
}

// HasPermissions returns true if the role has all of the permissions
// provided by the slice, or if the role is an admin.
func (r Role) HasPermissions(perms []permission) bool {
    if role.IsAdmin() {
        return true
    }
    // if no permissions are provided, require admin privileges
    if len(perms) == 0 && !role.IsAdmin() {
        return false
    }
    // create a map of the required permissions
    var present = make(map[permission]bool, len(perms))
    for _, perm := range perms {
        present[perm] = false
    }
    // check if the role has all of the required permissions
    for _, perm := range r.Permissions {
        if _, ok := present[perm]; ok {
            present[perm] = true
        }
    }
    // if any of the required permissions are not present, fail authorization
    for _, ok := range present {
        if !ok {
            return false
        }
    }
    return true
}